Door Care and Handling – How to Remove Plastic Film from Glass Doors
Insure proper care when removing factory-applied plastic film from glass on doors to protect the glass, maintain quality, and avoid voiding warranties—follow our step-by-step guide for best results.
Door Care Finishing & Handling Instructions
Doors should not be considered ready for painting when initially received.
Handling
1. Doors should be stored flat on a level surface in a dry and well-ventilated building.
2. Doors should never be stored directly on concrete or leaned against walls.
3. Doors should not be subjected to extreme or rapid changes in heat or humidity.
4. Allow doors to acclimate to the conditions before hanging.
5. Ensure that the atmosphere is free from excessive humidity, running a dehumidifier in the home to extract excess moisture in the atmosphere while the doors are still unfinished.
Preparation for Finishing
1. Lightly sand entire door using 150-220 grit sandpaper to remove all handling marks and any undesirable blemishes.
2. After sanding, wipe entire door with a clean cloth to remove all dust or foreign material.
Note: Do not use caustic or abrasive cleaners.
1. Doors should be finished within 48 hours of delivery to job site.
2. Good quality water-based acrylic latex or alkyd enamel paint recommended.
3. Always consult your paint suppler for a recommendations on what should be used for a solid wood product.
4. All 6 surfaces (top, bottom, sides) must be sealed with primer and paint.
5. All 6 surfaces (top, bottom, sides) must be sealed for stain grade doors, must be sealed with stain or varnish.
6. Both sides and all 4 edges must be painted with a minimum of 1 coat of primer and 2 topcoats of paint.
It is the finisher’s responsibility to protect glass prior to and during finishing. Doors should be tested for compatibility with the finishing system. Paint a small area of the door to ensure desired look. If the desired look is not achieved, do not proceed, contact your paint
manufacturer for assistance. If the above instructions are not adhered to, any warranty will be voided.
Why You Need to Remove Plastic Film from Glass Properly (Factory Applied)
When your doors arrive from Royal Door, many include protective plastic film on the glass to prevent damage during finishing. This film is factory-applied to shield the glass from stains, paint, and scratches—but improper removal of plastic film from glass doors can result in permanent damage, residue, or scratched surfaces.
Understanding the right removal process is key to maintaining product integrity and ensuring your warranty remains valid.
Step-by-Step: How to Remove Plastic Film from Glass Doors
For factory glazed doors, we cover each pane of glass with plastic film to protect them during the application of finishing products such as paint, stain or varnish. This plastic protection reduces the risks of stains and paints on the glass. Do not remove the plastic until you have completed painting or staining your door.
- On doors that have plastic film protection on glass, removal of plastic film protection immediately after applying the finish is required. Failure to remove the plastic film at this time may cause harm to the glass and will create difficulty in removing the film at a later time.
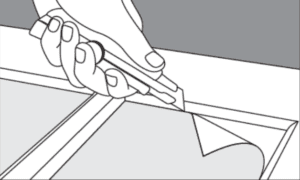
- A razor knife is recommended to remove the film by carefully trimming the film from as close to the perimeter of the glass as possible to the glazing bead. Score the film mask with the blade of the knife inclined against the glazing bead and carefully cut at an angle of 45° (perpendicular) to the plane of the glass surface. This will prevent leaving a visible mark or scratch on the glass. (see Figure below)
- DO NOT cut the film in the field of the glass or in any of the viewing area of the door glass. ONLY cut in the perimeter of the glass against the glazing bead. The razor knife may scratch the glass and all precautions must be met to not do so.
- Peal back one corner of the scored plastic film using a dull object or plastic scraper starting in one corner of the glass pane and pealing inward.
- Repeat this process on other individual panes and on the other side of the door.
- In the case that any residual primer or paint has made contact with the field or the viewing area of the glass, do not clean the paint with a razor knife or sharp object.
- DO NOT use razor blades or metal scrapers of any size or type for cleaning glass
NOTE: It is the finisher’s responsibility to protect glass prior to and during finishing. If using an after-market tape or film masking in the field, conduct a test of the tape or film being used on a small area of the glass before applying to a large surface. After finishing, remove the tape or film as soon as possible. If the above instructions are not adhered to, any warranty will be voided.
We thank you and appreciate your order and business.
Step-by-Step: How to Remove Plastic Film from Glass Doors
To ensure long-term clarity and product durability, always store doors in a dry, climate-controlled environment before installation. If your door includes glass inserts or trim moulding, be mindful during handling and finishing to avoid unintentional pressure or abrasions that could affect glass bonding or surface quality. For best results:
Remove any packaging carefully, avoiding dragging sharp tools over surfaces.
Avoid exposing doors to extreme temperatures before the finish is fully cured.
Refrain from leaning doors against uneven surfaces, which could stress glass components.
These care practices are especially important for glass doors, wood front doors, and any model with exterior trim. For more detailed information, including downloadable guides and videos, visit our Resource Hub or speak with a Royal Door representative directly.
By following these simple care and handling instructions, you help protect your investment and maintain the beauty, function, and warranty coverage of your Royal Door product.